
The Media Library icon allows users to:
- upload new images
- browse the media library for existing images
- upload new documents (PDFs)
- resize and crop images within the media library
Please do not use the Media Library to upload videos. Use the Video Embed icon to add videos to your page.
Note that you can also upload media items directly to the Media Library by navigating to Content > Media > Add media. Once uploaded, the media items will be available for use on pages.
The Media Library accepts common web image formats (JPG/JPEG, PNG, GIF) and documents (PDF). For best performance, compress images before uploading. If an upload fails, double-check the file type and size, then try again.
Who can see your uploads?
Media Library items are available to site editors so they can be reused across pages. Upload only content you have rights to use and that is appropriate for reuse on other pages.
Adding a New Image to the Page
To maintain fast page load times, aim to keep individual image files under 200–250 KB, and keep total image weight per page below 1 MB when using multiple images. Learn more about preparing site content.
- Make sure the Body field text format is set to Full HTML
- Place your cursor at the start of the line where you want the image added
Click the Insert from Media Library icon

Click the Select files button under Add File.

- Browse your computer and select the compressed/cropped image. Before uploading, rename files so others can find and reuse them. Use clear, descriptive names in lowercase with hyphens (for example, cell-biology-lab-students-2025.jpg). Avoid spaces, special characters or default camera file names.
- Add the required alternative text. Alt text supports accessibility by describing the image’s content or purpose. Keep alt text brief and specific. Avoid “image of” or “picture of” - screen readers already announce it’s an image. Describe what’s important for someone who can’t see the image (for example, “Students wearing headphones at individual workstations in the Selley Study Commons”).
- Add title text (optional). Title text is used as a tool tip when the user hovers the mouse over the image
Click the blue Save and Select button

Click the blue Insert Selected button

Click on the image to access editing options for size, alignment, and alternative text. To adjust size, click the Default dropdown (left of the alignment buttons) and select a size such as CKE Media Resize Large or CKE Media Resize Medium.

- Click the blue Save button at the bottom of the page once done
AI Image Alt Text
Alt text suggestions on upload
When you upload an image to the Media Library, Drupal may automatically suggest alternative text using the AI Image Alt Text feature. This tool analyzes the image and generates an alt text draft to help speed up publishing and support accessibility.
Important: AI-generated alt text is a starting point, not a final answer. Always review and edit the suggestion before saving to make sure it is accurate and appropriate for the context of your page. If the suggestion isn’t helpful, click Generate with AI again to get a new option. If it’s still not suitable, delete it and write your own alt text. It’s always better to have accurate, human-reviewed alt text than a generic or incorrect AI description.

Batch AI Image Alt Text suggestions
You can also use AI Image Alt Text to batch-generate alt text for images that are already in the Media Library.
- Navigate to Content > Media.
- Filter for Type = Image.
- In the media table, review any existing alt text in the ALT TEXT column.
- Select a small batch of images (recommended 1–5) that you would like AI alt text suggestions for. Note: Selecting more than 5 images may result in long processing times.
- In the Action dropdown, select Generate Alt text, then click the "Apply to selected items" button.
- Review the updated alt text in the media table and edit as needed for accuracy and page context.

Tips for using AI alt text
- Check accuracy first. Make sure names, locations, objects and activities are correct. AI can miss details or misidentify subjects.
- Adjust for context. The same image may need different alt text depending on the story you’re telling. For example, an image of students in a lab might emphasize the students in one context and the equipment or research in another.
- Keep it concise. Aim for a short, meaningful description rather than a long caption.
Adding an Existing Media Library Image to the Page
- Place your cursor at the start of the line where you want the image added
- Click the Insert from Media Library icon
- Below the Add File dialog box, either type in the image file name in the Name search field or scroll through the image library
- Select the image and click the blue Insert Selected button
- Click on the image to access the image edit options to adjust the size, alignment or alternative text of the image.
- Click the blue Save button at the bottom of the page once done
Uploading a PDF
Whenever possible, content should be added to your site as standard web content rather than as a PDF. PDFs can reduce accessibility for users who rely on assistive technologies, create a poor experience for mobile users, and are not as easily indexed by search engines. They are also harder to maintain and track. It is difficult to know how often a PDF is viewed or whether it contains outdated information. If the information is temporary or subject to frequent changes, web content is often a better option.
If the content must be uploaded as a PDF, keep the following best practices in mind:
- Ensure the PDF is accessible. Use heading structure, alt text for images, readable fonts, and proper tagging so screen readers can interpret the document correctly.
- Use a descriptive, human-friendly file name. Save the file using lowercase letters, no spaces, and use underscores (for example, project_regulatory_document.pdf).
- When linking to the PDF, use descriptive link text ("Download the Project Regulatory Document (PDF)”) instead of generic language like “Click here.”
- Provide a summary. Consider summarizing the contents of the PDF on the webpage to help users decide if they need to download it.
- Keep file sizes small. Large files can slow down page load times and frustrate users. Aim for a file size under 1 MB whenever possible.
There are two common ways to add a link to a PDF in Drupal - uploading the file to Drupal or linking to the file in Box. Whichever method you choose, be sure to use descriptive link text so users know what they’re clicking on.
Upload a PDF to Drupal
Document Media Type —for author user role
- Log in to your Drupal site.
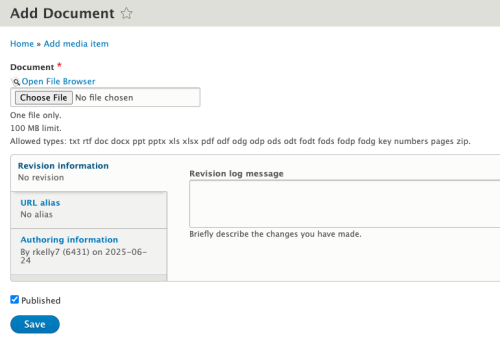
- Navigate to Content > Media > Add media.
- Select "Document" as the media type.
Click Choose file, locate your PDF, and click Open. Click Save to upload the file.
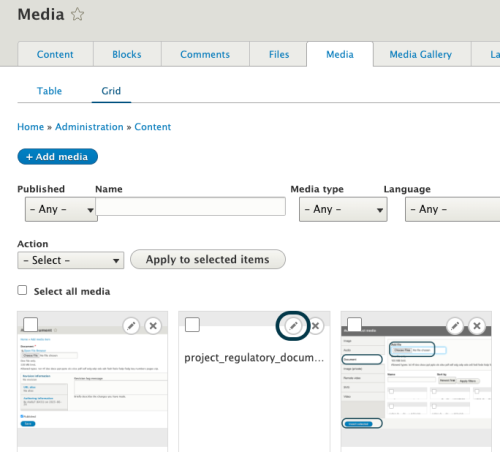
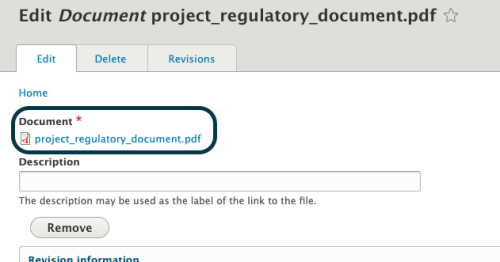
In the Media Library, find the PDF you just uploaded and click the pencil icon to open the Edit Document screen.
Copy the File URL (you’ll use this to create the link).
- Go to the page where you want to link to the PDF.
- Use the CKEditor link tool to insert the copied URL to your descriptive link text.
Tip: This method is recommended if you want to manage PDFs through the Media Library and reuse them across multiple pages.
IMCE File Browser —for admin user role only
- Highlight the text you want to use as the link (descriptive link text).
In the CKEditor toolbar, click the "Insert file links using IMCE File Manager" icon.

In the IMCE File Browser, wait for the public:// directory to load—it may take a moment. Click Upload in the IMCE window, then click the green + Add File button.

- Select and upload your PDF file. Once uploaded, the PDF will appear in the file list and be automatically highlighted.
- Click Select at the top of the IMCE window. The PDF link will be inserted into your selected text.
- Click Save to update the page.
Note: This method is convenient for one-time or page-specific uploads but is not connected to the Media Library.
Share a PDF from Box
You can share a link to a PDF uploaded to Box instead of uploading the file directly to your Drupal site. One advantage of using Box is that you can replace the file with an updated version without changing the link. In contrast, Drupal typically assigns a new file name to each upload, which means you would need to update any links to the file each time you make a change.
- Upload your PDF to Box and ensure the sharing options are set appropriately. Check out the Box resources provided by IT for more information.
- Copy the "Share Link" in Box and use this URL to link to the file from your Drupal page.
Media Editing and Cropping Tools
To resize or crop an image, please read the Media Editing and Cropping Tools user guide here.
